Working with Folders
The folder structure is displayed down the left hand side of the page and can be navigated in a very similar fashion to using Windows explorer on your desktop – by clicking on each folder you can expand them out further to view the structure that has been setup.
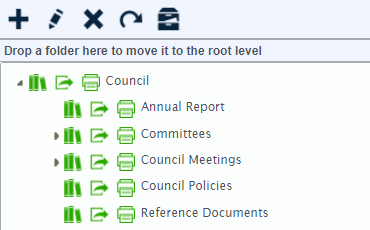
Icons used in Folder Structure
 -This denotes that there are further levels underneath the selected folder which can be accessed by expanding out the current level to show all child nodes underneath.
 - This icon is used to denote the Publish status of the folder
 - This icon is used to denote the ability to share (email) any documents added to this folder.
 - This icon is used to denote the ability to print any documents added to this folder.
Each of these items will be covered further below. It is important to understand however that the colour of the icon for the last three listed above denotes the status of each setting.
A green icon denotes the affirmative setting whereas a grey coloured icon denotes that the option has been switched off for the selected folder. Controlling this setting is done via the edit option.
It is also important to note that whenever an end user selects either the Share or Print option where that has been enabled, the application automatically logs that process which is then visible from the Dashboard in the Admin Portal. In addition with the Share feature, the application captures to whom the email has been sent.
Adding a New Folder
To add a new folder you need to do 2 things, first select the existing node that the folder is to be assigned to and then click on the  icon from the shortcut options displayed at the top of the folder structure.

If the folder you are creating is to be a top level folder, you still need to select one of the existing top level folders and when you get the Add screen shown below, just do not add a tick in the check box where it is asking you to add it as a sub folder. By leaving this checkbox unticked the system will add it in as a top level folder:
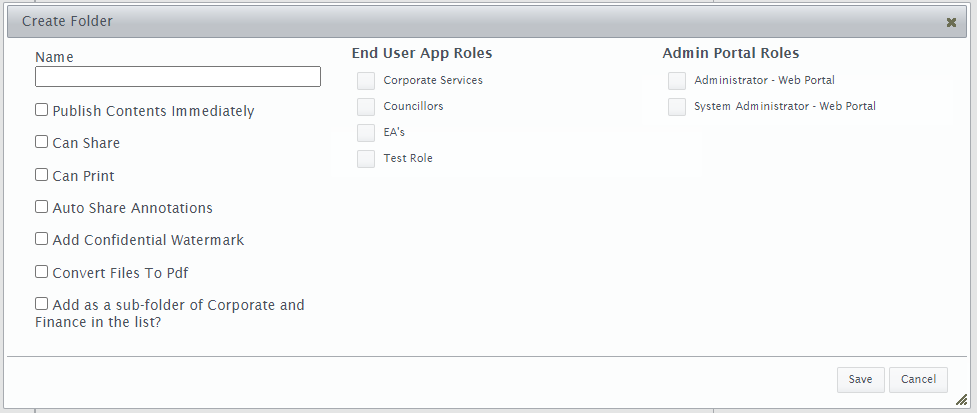
The form is pretty self explanatory – enter the name for the new folder and then determine the settings you want for each of the options listed above. In regards to the following three options:
- Can Share
- Can Print
- Add Confidential Watermark
It is noted that these options can act independently of one another or be applied to the same document. The option to control the end users ability to email or print the document will have the effect of either enabling (when selected) or disabling (when left unticked) the users ability to either share (email) or print the document when viewing it in the App. In addition to that feature, the Administrator can opt to have the document when viewed in the App (and or emailed or printed) include a comprehensive watermark that includes the end users name. This is provided as an additional security feature for those documents considered confidential.
Auto Share Annotations
This option needs particular attention paid to it, as enabling this feature will mean any annotations added to a document placed in this folder will be automatically be shared with ALL users who have access to this folder. Note that this setting only affects annotations added after the Auto Share Annotations option is enabled. This setting can also be overridden for individual documents or attachments.
*Careful consideration should therefore be given to make sure that it is only applied to the appropriate folder/documents and that end users who have access to the folder are fully aware that any comments that they add against a document are visible to all other users reading the document.*
Saving Your Changes
At this point you are also able to nominate which End User and Admin Portal roles have access to this folder (see discussion further on for more details on these role types). Clicking on the save button will add the new folder into the system.
Moving a Folder
The option is provided to drag and drop an existing folder should it have been added in at the wrong level or if you wish to restructure the folder setup. This option is available by clicking on a folder and then dragging it to the folder you want to assign it to. When you release the mouse button it will then be placed as a subfolder.
You will be prompted to confirm your action as follows:
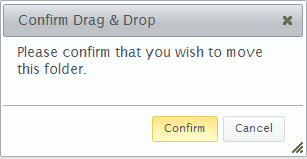
If you want to make the folder a root (top) level folder then you must drag it to the panel at the top of the list labelled “Drop a folder here to move it to the root level”.
Editing a Folder
Editing a folder is done by clicking the  icon – when you edit a folder you can modify its name and status in regards to the various options provided as shown below:
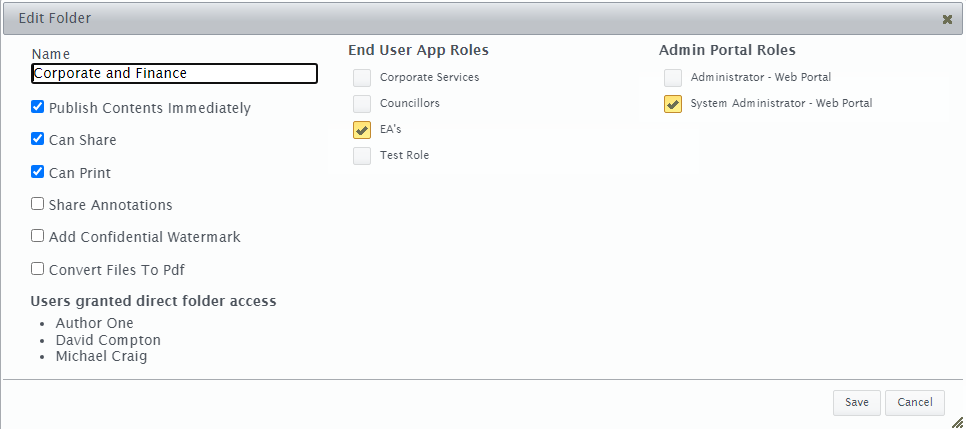
Note, if the folder already has documents under it, changing the status here in regards to the transfer to external app and publishing options does not automatically update existing documents, you will still need to do that via the documents section. The change in status will only apply to new documents added to the folder.
One of the features provided by the Web portal is the ability to assign permission to access the folder for both tablet and web portal roles. In addition you are also able to view individual users who have been granted direct access to the folder via the Users tab rather then via the Roles function.
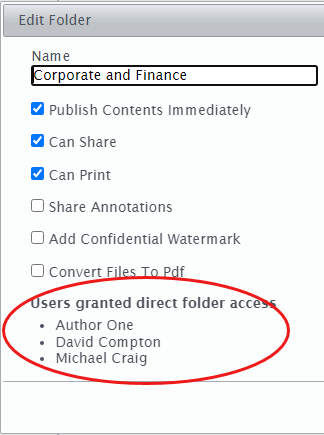
From this screen you are not able to modify direct access Users, this can only be done from the Users Tab. The concept here is simply to highlight any users that have been granted direct access to the Folder outside of a Role.
Publish Option
An option is available at the Folder and Document level that enables you to control if a document is to be automatically published to the end users when it is loaded into Docs On Tap via the web portal.
If you edit a folder you set a flag that controls the timing of the release of any documents put into that folder:

By placing a tick in this field any documents added to this folder will automatically be made available to the end users who are subscribed to this folder as currently happens.
If you remove the tick, any documents uploaded will not automatically be made available and you will need to follow the process described under the Publishing section to make them available.
As noted previously visually you can tell the setting for this value from the tree display for the folders via the publish icon  - displayed alongside the folder and document to indicate their status.
At the folder level, if the icon is green it means by default the documents added to this folder will automatically be published, if it is grey then it means that this setting is not set to automatic publish and you will need to manually publish the documents.
At the document level, if the icon is green it indicates that the document has already been published to the end users, if it is grey, it means that it has not yet been published to the end users.
Note – As you can edit this setting at the document level (see below) a document which has previously been set to be published can have this parameter modified to switch it off.
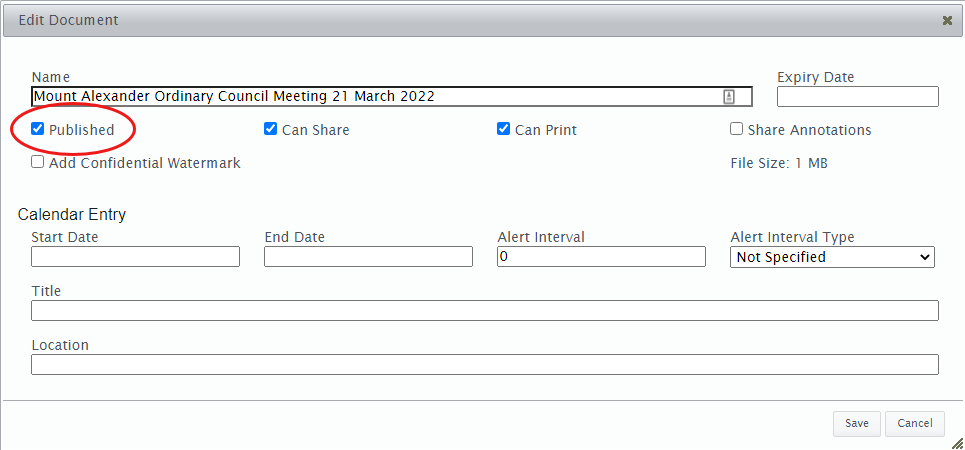
The impact of modifying this parameter as described simply means that anyone who hasn’t synchronised their iPad when the document was initially published will not receive the document. If an end user had synchronised their iPad when the document was initially made available they will still be able to download the document even though the Publish parameter has now been switched off.
Deleting a Folder
The  icon enables you to delete a folder. A folder cannot be deleted if it has documents attached to it – you need to remove all of the documents first before you can delete the folder.
Marking a folder as deleted simply sets a flag against the folder to say it isn’t active any more, it doesn’t actually delete it from the database which is where the next 2 icons come into play, displaying deleted folders and restoring them.
Restoring a Deleted Folder
To restore a deleted folder you must first display all deleted folders. To do this you need to click on
this  icon which will redisplay all of the folders that have been deleted with a strike thru line visible. To restore the folder just select the one you want and then click on the Restore option and the folder will once again be shown as active.
If you have finished viewing all of the deleted folders click back on the  icon and you will be returned to the normal view.