Users
The Users Page enables you to manage and edit details relating to the end users. This includes the option to assign users permissions to view or access folders. By granting a user the right to view a folder you are effectively giving them permission to access all documents attached to that folder.
Within the Web Portal there are 3 security levels that are displayed here which are used by the web portal:
End User
Does not have rights to log onto the web portal at this stage and can only access documents on the tablet device based on the permissions assigned to them via the web portal.
Admin User
only has access to the dashboard, documents, unpublished and users tabs of the web portal.
- The Users tab is available as as a read only list of users, no ability to add or manage users is provided.
- On the Dashboard tab:
- Admins cannot see any activity related to the maintenance of roles or users on the Activity List.
- Admins can only see documents and attachments that are in folders that are assigned to them via their web portal role.
- Admins cannot see any logs related to the maintenance of roles or users.
- On the Documents tab Admins can only view and manage folders, and the documents and attachments they contain, that are assigned to them via their web portal role.
System Administrator
This user has full access to the system with the ability to create and maintain existing users including setting the appropriate security level for these users.
Adding a User
To add a user you just need to click on the add icon and then complete the details required in the Create user form.

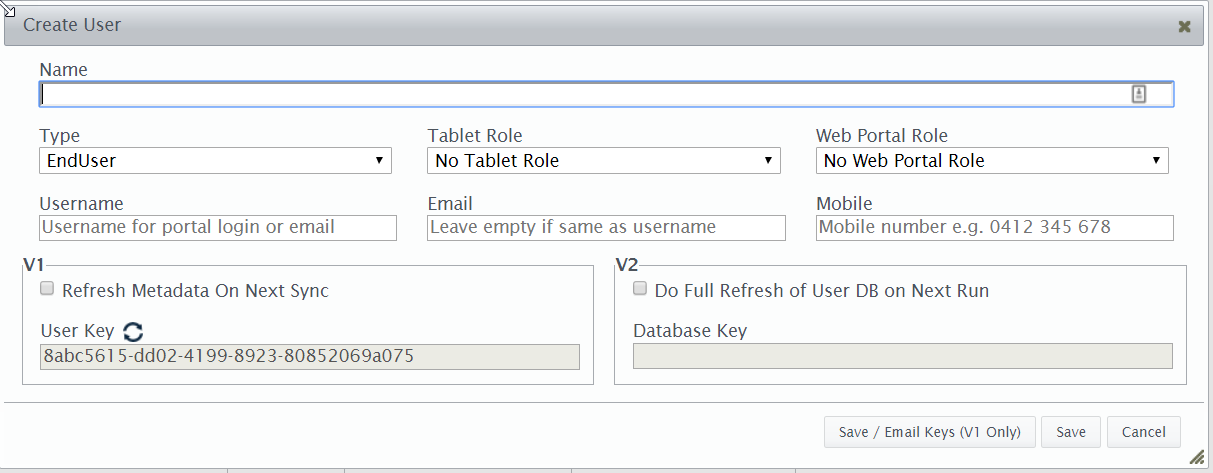
The type option is where you assign the security level discussed above. The users email address is required as part of the setup process in order to email to them the key values automatically generated for them and displayed here. The email that is sent to them when received on their tablet device contains a hyperlink for them to click on which will automatically create the sync source for your site, enabling them to get up and running quickly.
Once you have populated all of the required fields you can either save and email the keys to the end user by clicking on the  button or simply just save the details by clicking on the
  button. This feature just lets you setup all of your users and roll out the application as it suits. If you are setting up a number of users you can come back later and email the keys to them by editing the user record and selecting the Save/Email Keys button on this form. However a more efficient way to do it is use the email key option which will be covered further on.
Once you have created a user the next step is to assign them rights to access the various folders you have in the system.
Assigning User Roles and Folders
The Users Tab appears as follows:
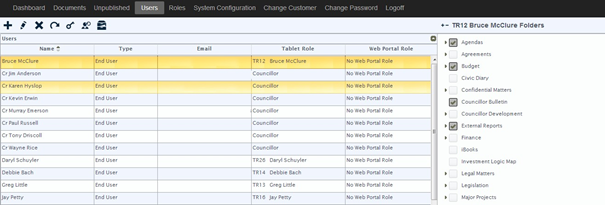
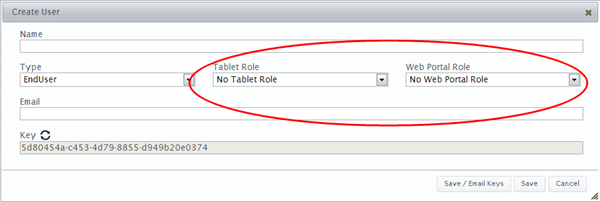
The maintenance option provided in the Users tab remains enables you to assign the Roles (Tablet and Portal) that they are associated with. The following screen shot shows these options when you select the Add new user option:
When you select a user, the Role to which the user has been assigned is shown in the right hand side of the Users screen – in this example the selected user is associated with the role Senior Executive:
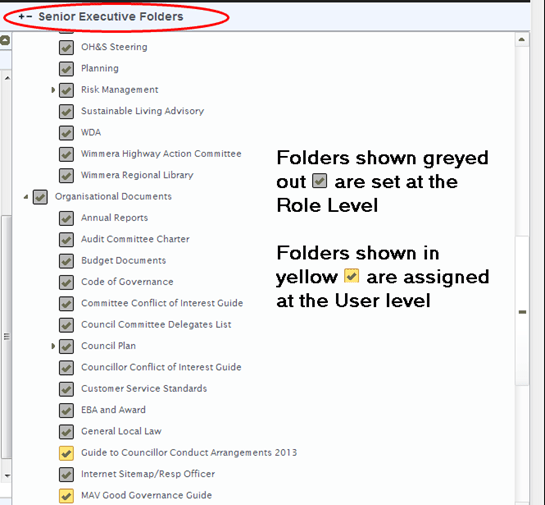
The important thing to note here is that you can assign folders to a User from within this section. Any folders shown ticked and greyed out  are set at the role level and cannot be modified via this screen. These folders can only be maintained via the Role Tab and any changes will be applied against all users associated to the Role.
The folders shown ticked and coloured in yellow  denote folders that have been set at the User level in this screen and can be modified directly here.
The things to note here are:
- A user can have folders assigned to them at either Role level or User level.
- A folder assigned at the User level
 which is subsequently included in the Role will automatically be shown as
  coming from the role record.
If the Administrator method to ensure should a user experience any issues a process is available to the Administrator to manually correct the problem.
This option is available from the Users Page on the web portal as shown below:
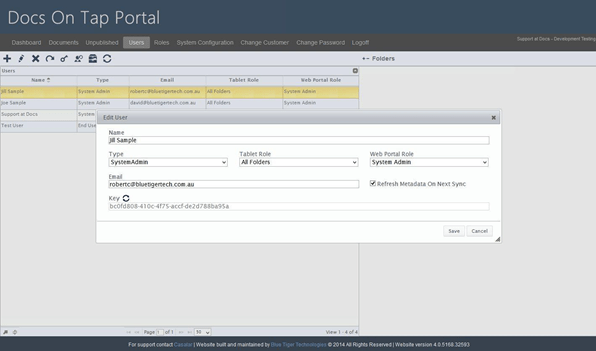
As shown above when the Administrator edits the selected user they can set the option to refresh the meta data for that user the next time they sync their device.
Delete A User
To delete an existing user you must first select them from the list and then click on the delete icon -  . You will be prompted to confirm your selection. Once you do so the selected user will be deleted from the system.
When you delete a user the impact of this is that the next time that the user tries to synchronise their data they will not be able to. Documents already downloaded onto the tablet device will still be accessible on the device, the user will simply not receive any new or updated documents
Restoring A User
If you have deleted a user you are are able to restore them using these two options – firstly you
need to display deleted users by clicking on this icon - , once they are displayed you can then select a deleted user and click on the restore icon -
  which will then make the user active again.
Deletion of All Data from a User's Device/s
From the Admin Portal the System Administrator is able to delete all data from a user's device/s (e.g. a former councillor/employee). When this option is selected it will also clear the End User App Role to ensure that no further data will be published to the user. The checkbox will be cleared by Docs On Tap once the deletion process has finished.
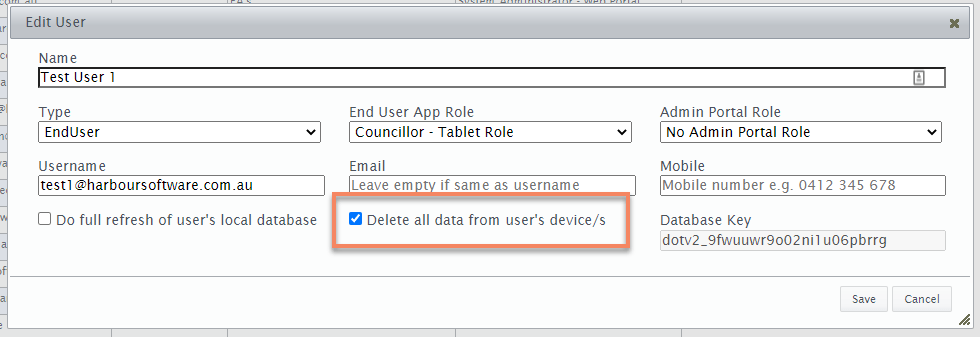
Note that this option will effectively make the app unusable for the end user - reinstating it for use will require intervention from Harbour Software.
Reset Portal Password
At any stage the system administrator is able to reset the password for any user who accesses the
web portal. To do this just select the user from the available list and then click on this icon –  the system will reset the users password to the system default and send an email to them advising that their password has been reset and including details for the default password.
The first time that the user logs back onto the Web Portal once their password has been reset they will be prompted to enter a new password. This will occur anytime a user logs on using the default password – the system will ask them to reset it before they can access the portal.